
Operation 0ri0n - Local AI
Recently, I found time to explore a new area and decided to delve into Data Science, specifically Artificial Intelligence and Large Language Models (LLMs).
Standalone AI Vendors
Using public and free AI services like ChatGPT, DeepSeek, and Claude requires awareness of potential privacy and data risks. These platforms may collect user input for training, leading to unintentional sharing of sensitive information. Additionally, their security measures might not be sufficient to prevent unauthorized access or data breaches.
Users should exercise caution when providing personal or confidential details and consider best practices such as encrypting sensitive data and regularly reviewing privacy policies.
Here are a few vendors that offer open-source models to the public:
Remote Private AI
Running LLMs in a private but remote setup, as shown in the GitHub repository, balances local control and scalability by using external servers or cloud resources dedicated to your organization. This approach enhances data privacy compared to public clouds while offering ease of management, performance benefits, and scalable infrastructure for handling larger workloads.
WARNING: This setup can be very expensive.
This pattern provisions infrastructure and integrates GitHub Actions for streamlined automation.
Local Home Lab AI
Running LLMs locally enhances data privacy, improves performance due to reduced network latency, and offers greater flexibility for customization and integration with on-premises systems. This setup also provides better resource control and can be cost-effective, especially for organizations with existing hardware infrastructure.
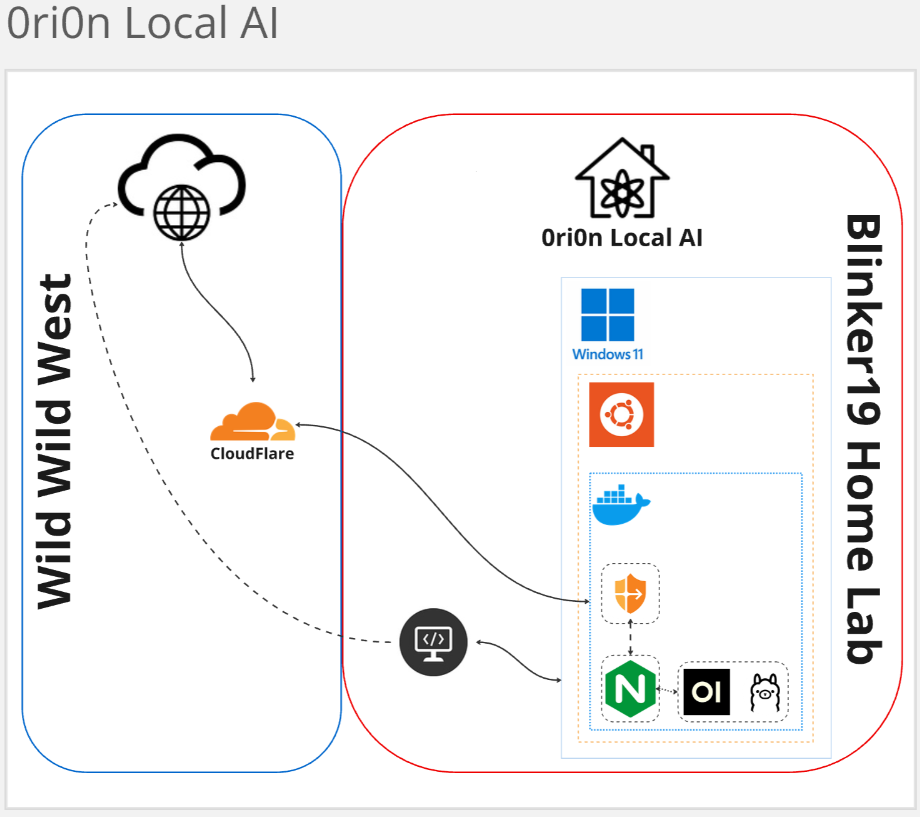
My Home Lab Architecture for Operation 0ri0n
Technical Document: Setting Up Open-WebUI and Ollama
Recommended Hardware Components
To ensure optimal performance when setting up Open-WebUI and Ollama on Windows Subsystem for Linux (WSL) with GPU support, consider the following hardware components:
- GPU (Graphics Processing Unit):
- A powerful NVIDIA GPU is essential for running LLMs efficiently.
- 0ri0n: Nvidia GeForce RTX 4090 16 GB
- A powerful NVIDIA GPU is essential for running LLMs efficiently.
- CPU (Central Processing Unit):
- A high-performance CPU with multiple cores and robust architecture.
- 0ri0n: Intel Core i7-14700F 2.10 GHz
- A high-performance CPU with multiple cores and robust architecture.
- RAM:
- At least 16GB of RAM, but preferably 32GB or more for smoother operation and faster model loading times.
- 0ri0n: 32 GB
- At least 16GB of RAM, but preferably 32GB or more for smoother operation and faster model loading times.
This setup will help you run Open-WebUI and Ollama effectively on your system.
By choosing Windows 11 and relying on WSL, we leverage the popularity and ease of use of a Windows environment while harnessing the power of Linux. This setup is convenient for highlighting and testing WSL capabilities.
Steps:
From Windows 11, open a PowerShell prompt as Administrator and run:
WSL Installation:
> wsl --install
This command installs Windows Subsystem for Linux (WSL) to provide a lightweight version of Linux on your Windows machine.
You should see a different prompt when WSL finishes starting.
Docker Installation:
$ curl https://get.docker.com | sh
This command downloads and runs a script that automatically installs Docker on the system.
Install NVIDIA Driver for Docker Containers:
$ curl -fsSL https://nvidia.github.io/libnvidia-container/gpgkey | sudo gpg --dearmor -o /usr/share/keyrings/nvidia-container-toolkit-keyring.gpg && curl -s -L https://nvidia.github.io/libnvidia-container/stable/deb/nvidia-container-toolkit.list | sed 's#deb https://#deb [signed-by=/usr/share/keyrings/nvidia-container-toolkit-keyring.gpg] https://#g' | sudo tee /etc/apt/sources.list.d/nvidia-container-toolkit.list && sudo apt-get update
$ sudo apt-get install -y nvidia-container-toolkit
$ sudo service docker restart
These commands download and add the necessary GPG key, configure the NVIDIA container toolkit repository, install the toolkit, and then restart Docker to use the GPU with Docker containers.
Install Open-WebUI and Ollama:
This command runs a Docker container named ollama using all available GPUs, mounts a volume for persistent storage, exposes port 11434 on both the host and the container, and sets environment variables to enable specific features like flash attention and quantization type.
$ docker run -d --gpus=all -v ollama:/root/.ollama -p 11434:11434 --name ollama --restart=always -e OLLAMA_FLASH_ATTENTION=true -e OLLAMA_KV_CACHE_TYPE=q4_0 -e OLLAMA_HOST=0.0.0.0 ollama/ollama
This command runs a Docker container named open-webui, uses the host network mode for better performance, mounts a volume for data persistence, sets an environment variable with the OLLAMA_BASE_URL, and ensures the container restarts automatically.
NOTE: The environment variables
OLLAMA_FLASH_ATTENTIONandOLLAMA_KV_CACHE_TYPEenable quantization and context quantization. You can omit these from the command if you encounter issues.
$ docker run -d --network=host -v open-web:/app/backend/data -e OLLAMA_BASE_URL=http://127.0.0.1:11434 --name open-webui --restart always ghcr.io/open-webui:main
For a quick test, try this command to see how much GPU RAM is being utilized:
$ nvidia-smi -l
Check out Ollama and Open WebUI for more specifics.
Set Up Static IP on 0ri0n:
I configured a static IP, but this is not necessary, especially if you already have DNS or DHCP implemented in your network.
Edit /etc/netplan/01-netcfg.yaml with the following configuration:
network:
  version: 2
  renderer: networkd
  ethernets:
    eth0:
      dhcp4: no
      addresses:
        - <IP_ADDRESS>/20
      routes:
        - to: default
          via: 172.20.80.1
      nameservers:
        addresses: [8.8.8.8, 8.8.4.4]
This YAML configuration sets up a static IP address for the network interface eth0, assigns it a specific IP, configures the default gateway, and sets DNS servers.
Expose WSL Port in Windows:
Run the following commands in PowerShell as Administrator:
> netsh interface portproxy add v4tov4 listenport=11434 listenaddress=0.0.0.0 connectport=11434 connectaddress=<IP_ADDRESS>
> netsh advfirewall firewall add rule name="ServicePort11434" dir=in action=allow protocol=tcp localport=11434
This opens the firewall port on Windows 11 so that you can access the API provided by Ollama from other devices on your network.
Start WSL on Windows 11 Startup:
This step is optional but ensures that all services return if the desktop reboots.
- Open Task Scheduler by pressing
Win + S, type “Task Scheduler”, and open it. - Click on “Create Basic Task” in the right pane, give your task a name and description, then click “Next”.
- Choose “When the computer starts” as the trigger, then click “Next”.
- Select “Start a program” as the action, then click “Next”.
- Browse to
C:\Windows\System32\wsl.exe. - In the “Add arguments” field, enter
--distribution Ubuntu(replaceUbuntuwith your distribution name if different). - Click “Finish” to create the task.
This process sets up a scheduled task in Windows Task Scheduler to start WSL on system startup.
At this point, you should be able to start inferencing with the models being served or download your first model.
Try accessing Open WebUI @ https://localhost:8080 or whatever your IP is for your Open WebUI Docker instance.
Nginx Proxy
I created a proxy that listens on port 443 and passes the traffic to the Docker container and port 8080 for the Open WebUI GUI.
docker run -d --name nginx -p 443:443 -v ~/conf.d:/etc/nginx/conf.d -v ~/ssl:/etc/nginx/ssl --add-host=host.docker.internal:host-gateway --restart always nginx:alpine
cat << 'EOF' > ~/conf.d/open-webui.conf
map $http_upgrade $connection_upgrade {
    default upgrade;
    ''      close;
}

server {
    listen 443 ssl;
    server_name <ip_address>;

    ssl_certificate /etc/nginx/ssl/nginx.crt;
    ssl_certificate_key /etc/nginx/ssl/nginx.key;
    ssl_protocols TLSv1.2 TLSv1.3;

    location / {
        proxy_pass http://host.docker.internal:8080;
        proxy_set_header Host $host;
        proxy_set_header X-Real-IP $remote_addr;
        proxy_set_header X-Forwarded-For $proxy_add_x_forwarded_for;
        proxy_set_header X-Forwarded-Proto $scheme;

        # WebSocket support
        proxy_http_version 1.1;
        proxy_set_header Upgrade $http_upgrade;
        proxy_set_header Connection $connection_upgrade;

        # Timeouts
        proxy_read_timeout 300s;
        proxy_connect_timeout 75s;

        # Disable buffering for real-time responses
        proxy_buffering off;
    }
}
EOF
NOTE: Update the code to reflect the correct IP address.
For more info on Nginx
CloudFlare Tunnel:
To access my local model remotely or when away from my home network, I created a CloudFlare zero-trust tunnel. After creating an account and setting up a DNS record, I was given this Docker command with a token to run.
docker run -d cloudflare/cloudflared:latest tunnel --no-autoupdate run --token ******eE9Ea3la**********
This command runs the Cloudflare Docker container in detached mode, enabling a tunnel to route traffic through your machine to services running inside WSL.
Visit Cloudflare for more info on Zero-Trust Tunnels
Pausing Thoughts
Now our setup is complete, and all components are in place for us to:
- Access the Open WebUI GUI locally and remotely
- Access Ollama via the CLI locally
- Leverage the Ollama API locally
In today’s digital age, we constantly navigate between public and private spaces. Striking a balance is key to maintaining control and efficiency.
What is next?
Next, I plan to dive deeper into model specifics around quantization and tuning for efficiency, as well as explore the settings and features in both Ollama and Open WebUI.